In this post I will show you how to create SCCM Lab using Microsoft Endpoint Manager evaluation Lab Kit provided by Microsoft. This is one of the fastest way to get the hands on exposure on SCCM if you wanted to build your own Lab. Microsoft provides a zipped file of approx. 25GB size. Once downloaded, it hardly took me less than an hour to setup the virtual machines required for Configuration Manager.
How to create SCCM Lab
To create Configuration Manager Lab, you need to download the MEM Evaluation Lab Kit which provides Configuration Manager Lab with 180 days of evaluation period
What is Microsoft Endpoint Manager Evaluation Lab
To setup SCCM Lab for learning, Microsoft is providing Microsoft Endpoint Manager Evaluation Lab Kit which is a pre-provisioned setup of various servers such as Domain Controller, Configuration Manager server and others. They also provide various Workstations with Domain joined / workgroup scenario. You will be having complete details of username / password so that you can login and immediately start exploring the SCCM services.
This setup comes with an evaluation period of 180 days, hence you won’t be able to use it after this time and needs to download the latest Evaluation Lab Kit to continue.
If you wanted to install and setup Configuration Manager installation from scratch, then follow SCCM Install Guide using Baseline Media where I have covered all the pre-requisites, installation of Configuration Manager, SQL Server, preparation of Active Directory etc from scratch.
Prerequisites for creating Configuration Manager Lab
- Lab can be accessed through Windows 10, Windows 11 or Windows Server 2016 or later operating system with 64-bit version.
- Hyper-V role should be installed on Windows device. For Windows 10 /11 – Professional / Enterprise edition can be used. Hyper-V cannot be installed on Home edition of Windows.
- 150 GB of free disk space (300 GB is recommended)
- 16 GB of memory (32 GB is recommended)
- High-end processor
How to choose configuration for Laptop / Desktop for your SCCM Lab
- Based upon above configuration, I would always prefer Disk storage with SSD. This really makes a big difference as it provides high read / write performance as compared to normal HDD.
- For Processor, look for minimum 6 Core (12 threads). Anything less I won’t recommend.
- I will prefer i7 processor (though keep in mind for core / thread requirement). Xeon processor (which is server class processor) is the best. But device with Xeon processor could be very costly as it supports various other features such as ECC (error checking and correction memory) . i7 should be fine, that too gives a good performance.
- If you have any doubt on purchasing the device. The simplest answer would be, to go with a gaming laptop. Though I won’t consider it a best choice as Gaming laptops are focused upon 2 components ie. CPU & GPU. GPU is meant for high end Graphic performance, this might not be requirement for virtualization though. But choosing Gaming laptop, you are automatically choosing endpoint with high quality CPU, that is for sure. Once again, must focus on core and threads. Don’t go for less then 6 core /12 threads.
How to install Hyper-V on Windows 10 / Windows 11
As we know that Hyper-V is an inbuilt feature on Windows 10 / Windows 11 version Enterprise, pro and Education, but it is not enabled by default.
Hyper-V can be enabled in 2 ways.
Enable Hyper-V using PowerShell command
We can enable Hyper-V feature using PowerShell command, open PowerShell with Elevated rights and run the command:
Enable-WindowsOptionalFeature -Online -FeatureName Microsoft-Hyper-V -All

Feature will be enabled, it requires restart of Windows device to apply new feature.
Enable Hyper-V using command line
Enable Hyper-V using dism command line which uses Enable-Feature, open command prompt with elevated rights and run following command:
DISM /Online /Enable-Feature /All /FeatureName:Microsoft-Hyper-V
Enable Hyper-V using Settings
Enable Hyper-V by navigating to Control Panel > Programs and Features, click on Turn Windows features on or off.

Select Hyper-V and click OK. This will install Hyper-V role and following 2 options will be also selected automatically as part of Hyper-V installation:ypHy
- Hyper-V Management Tools
- Hyper-V Platform
Configure Hyper-V switch

We need to configure Hyper-V switch before configuring SCCM Lab as it requires external switch.
Launch Hyper-V, on right Pane click on Virtual Switch Manager, under Virtual Switches > Create virtual switch, select External and click on Create Virtual Switch.

Name it as External and select one the external network your devices are using to connect to internet.
We have now 1 External network created which will be used by Virtual Machines which will be created further.
Download MEM Evaluation Lab Kit
MEM Evaluation Lab Kit consists of 2 components:
- Download word file (in docx format) which is Lab guide and setup guide
- Download Actual Lab, virtual machines created by Microsoft with approx. size of 22GB.
Download Lab guide and setup guide
Download Microsoft Endpoint Manager Evaluation Lab Kit from Microsoft website. You will be able to get MEM Lab Kit_Lab Guides.zip file, extract it to get following 2 files::
- MEM Lab Kit_Lab Guide.docx – It’s a complete Lab guide for you to explorer SCCM once Lab is configured.
- MEM Lab Kit_set up guide.docx – A document on how to configure the Lab.

Download Actual Lab – Windows 11 and Office 365 Deployment Lab Kit
Download Windows 11 and Office 365 Deployment Lab Kit. You will get Win11_Lab_02.09.zip (It’s a big file approx. 22 GB which will take some time), extract it to get following 3 files:

- Microsoft365DeviceLabKit.zpaq
- Setup.exe
- Zpaq.exe

Setup configuration Manager Lab
Microsoft365DeviceLabKit.zpaq is a huge zip file consists of complete Configuration Manager lab. Extract it by running setup.exe with elevated rights.
You will be presented with Setup wizard to extract the content for Windows 11 and Office 365 Deployment Lab Kit, click Next.

On License page, click Next.

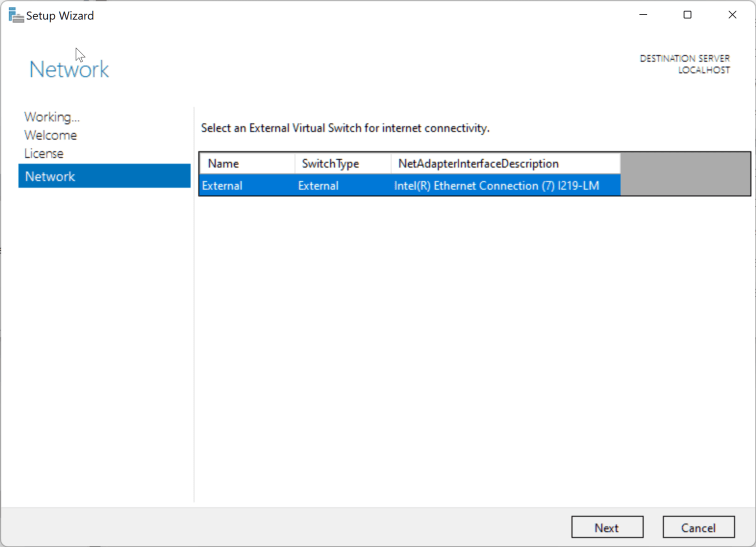
On Network page, setup will look for external network, as we have created this previously, it will be displayed. Click Next.

On Provision page, click on Next to start extracting the Lab.

Extracting of Lab using zip file (ie. .zpaq file) will take some time depending upon the speed of your system. For me it took somewhere around 20-25 mins.

Once done, you will be represented with “Your Lab is ready”.

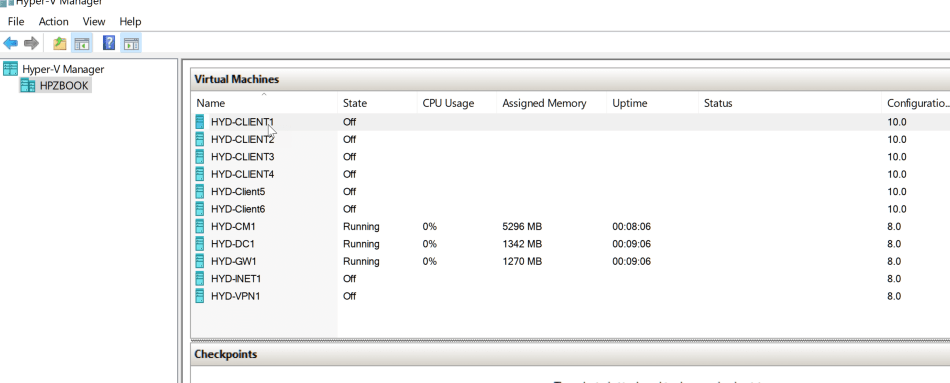
Launch Hyper-V, you will be able to see list of Virtual Machines already created.
When you check the location of the folder which we used to download the Win11_Lab_02.09.zip file, at same location folder is created with same name where all VM’s are created.
Access Configuration Manager Lab
Server VM’s are created with the name HYD- prefix. All these Servers are using a Parent Server file as base and on top of that each of them is having its on different vhdx file.\
This whole process saves lots of disk as all servers are going to use one parent disk.

Microsoft’s MECM lab consists of following details:
Domain : corp.contoso.com
Username: LabAdmin
Password: P@ssw0rd
For us most important VDI’s are:
HYD-CM1 – Pre-installed Configuration Manager on Windows Server 2022
HYD-DC1 – Domain Controller on Windows Server 2022

Login to the servers. When I logged into HYD-CM1 (ie. Configuration Manager server), I found only 113 days were remaining while it should be 180 days.
The reason is: The day Microsoft provisioned this lab, count down started from that day, not the day when you are configuring it.

If you wish, you can extend the server validity days again to 180 days by using rearm command.
Run the command (with elevated rights):
Slmgr /rearm

This will increase you validity to again use it for 180 days. After running this command, restart is required to apply another 180 days.
You may try extending the windows server evaluation to 180 days, but that doesn’t increase the evaluation days for Configuration Manager.
After restart, when you login to server. You will be able to see 180 days of evaluation days remaining for Windows server. Launch Configuration Manager console and you can see remaining day of evaluation period.

You can’t extend the remaining days, only option is to use Configuration manage product key.
The same is valid for SQL Server installed on Configuration Manager which also comes with 180 days, however the day you installed – it will show lesser days.
Microsoft used to update the configuration manager Lab quite frequently, hence use the same page to download the setup to configure another Lab with latest update and once again with 180 days of evaluation to explore.
You can also see list of Client Virtual Machines also provided. Launch Hyper-V, number of clients can be seen with prefix HYD-Client.
Conclusion
You have fully accessible lab for Configuration Manager along with Domain controller and Windows 11 clients. Configuration Manager server gets fully ready in couple of minutes with all required components such as:
- Microsoft Endpoint Configuration Manager
- Microsoft SQL Server 2017
- Microsoft SQL Server Reporting Services
- Windows Assessment and Deployment Kit
- Windows Assessment and Deployment Kit Windows Preinstallation Environment Add-ons
Though we can install the Lab manually also which gives good exposure completely. However, you are more willing to explore the SCCM features rather than installing it, this is the best way to go with.
All Virtual machines are already in a state with snapshot taken. Hence, you can explore it, If any wrong changes are applied, simply revert back to the previous state.
Important Link
Microsoft Endpoint Manager Evaluation Lab Kit | Microsoft Evaluation Center
Windows 11 and Office 365 Deployment Lab Kit | Microsoft Evaluation Center
Set up your lab – Configuration Manager | Microsoft Docs
Enable Hyper-V on Windows 10 | Microsoft Docs
Discover more from SCCM | Intune | Device Management| Enterprise Mobility & Security
Subscribe to get the latest posts sent to your email.


Thank you for this post. I got it all setup but had to stop. The guide included with the lab kit did not match anything in the Azure portal. I ended up posting in MS Community about it.
Hi,Is there anyway to be able to change the size and location of VMS during initial setup as the HDD max size is set to 512GB
Hi,
So I’ve downloaded and installed the Microsoft evaluation lab kit but when I try to open the Microsoft Endpoint Configuration Manager it is only showing the Administration tab. After about 5 minutes or so it says Configuration Manager cannot connect to the site (CHW-***********).
Any help?